One thing that you will often see in articles about productivity and decluttering is the idea of doing a “digital declutter”. While most of us (myself included) desperately need to clean up our computer hard drives, (for most people) the idea of digital decluttering usually starts with cleaning out our email inboxes.
- If you cringe when you see the 4 or 5 digit number next to the number of unread emails in your inbox, read on.
- If you cringe every time a productivity expert talks about “Inbox Zero”, read on.
- If people have to email you four or five times to get your attention, read on.
- And if you think “man, I really need to clean out my inbox” every time you open your email…read on.
STORAGE WARNING: If you’re reading this post anxiously because Google is sending you alerts that your “inbox is 80% full” and you have no idea why, then let’s address that first.
Google gives all Gmail account users 15GB of storage. Nowadays that might not sound like much, but it’s a fairly large amount of storage for emails and most people will never fill it.
However, if you have gotten those warning emails I mentioned earlier…I have only ever met two people who have gotten the warning that their Gmail storage was almost full. They each fell into one of the following two categories:
- They have had their Gmail account for a very long time (30+ years, in the case of one of the people I know who has received this warning) and has rarely deleted any emails, preferring instead to archive just about everything.
- They are sharing large media files among a large group of people…mostly 4K video.
Here are some simple rules for how to free up enough space to get Google off of your back:
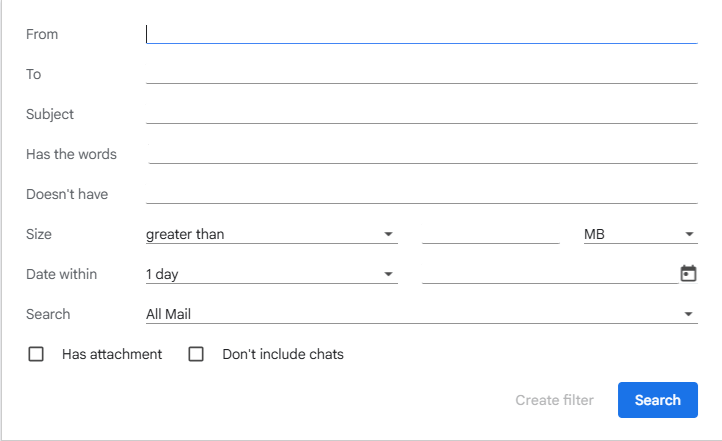
FILE STORAGE SHIFT: In the search box at the top of the GMail browser screen, start a search for:
- emails that have an attachment (check the “Has Attachment” box) and
- emails that have a Size greater than 1000 MB (aka 1 GB)
Download the attachments of any emails that pop up and delete the email. (Don’t worry, emails in the trash don’t count against your storage space quota.)
Re-do this search a couple of times, reducing the size limit by a “0” each time (100 MB, then 10MB and finally 1MB)
Keep an eye on the progress of this bar, which you will see in the bottom left corner of the Gmail browser screen:
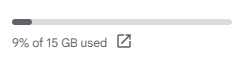
Once you get to the point of seeing that progress bar go to 50% of 15GB, this will no longer be an “urgent” issue on Google’s end and you will stop getting these emails.
Now if your problem isn’t storage of large file attachments, (or if you’re just looking to get your inbox organized)…you guessed it,
Read on!
HOW TO CLEAN OUT YOUR INBOX
This is for those of you who have had the same email address for decades: If the year that the email was sent has a 1 as the first digit, delete it. Chances are pretty good that you haven’t read any email that is over 25 years old in a very, very long time — and any information contained in those emails is most likely long obsolete by now.
If you have an ancient email that, for some odd reason, has some sentimental value to you: print it out, treat that paper like a snail mail letter of high sentimental value, then delete the email.
For emails older than 1 year (let’s say pre-January 2024): Create a folder/label called “Ancient History” (or your personal preference for a name). Dump all of your emails from that time into that folder and leave them there until the next time you decide to do a thorough cleanout of your inbox.
Now, let’s start with tackling the rest of your inbox. I believe that there is an 80/20 rule when it comes to emails: in most situations, 80% of your emails come from 20% of your contacts. Starting with this mindset should help you to clear large quantities of your emails out of your inbox rather quickly.
There are two rules when it comes to what emails can stay in your inbox (for a time):
- No email in your inbox should be older than one week. In the vast majority of situations, if an email came in a week ago and you haven’t followed up on it yet, then the chances are (much) better than average that the person who sent you that email will have already followed up on it — either by email, snail mail, a phone call or an in-person meeting.
- Anything that is not from a person (an ad, a newsletter, etc.) is only allowed to sit in your inbox for 24 hours. When is the last time that you sat down with a fresh cup of coffee to read last month’s newspaper? Yeah. If you haven’t opened the email in 24 hours and you’re not holding on to the email for a very specific reason (like a coupon code with a future expiration date), then you can go ahead and delete it.
So…feel free to leave anything in your inbox that’s less than a week old. But for everything else — we’re going to file it away. We’re not going to delete it (unless you want to delete things that fall under the newsletter rule), we’re just going to archive everything. That way, if you think you will need to look up information from a past email, you can search for it using the search function that is part of your email platform.
That search button works on all your emails, not just the ones in your inbox, so let’s take advantage of that!
In Gmail
I’m separating out Gmail for two reasons: 1) most of you are probably dealing with a Gmail address and 2) Gmail’s label system gives you flexibility that other systems don’t have. In Outlook (for example), you organize your emails by putting them into folders — and each email can only go into one folder. But since you can label emails in Gmail with as many labels as you want/need, you have a lot more flexibility when it comes to tailoring this system to meet your needs.
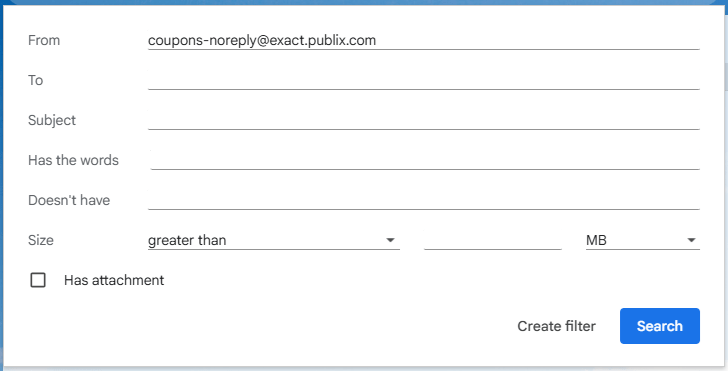
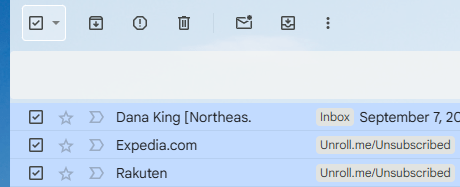
- Open an email. Any email.
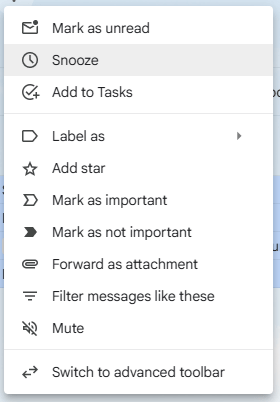
- Tap on the three dots in the right-hand corner of the email and select “filter messages like this”:
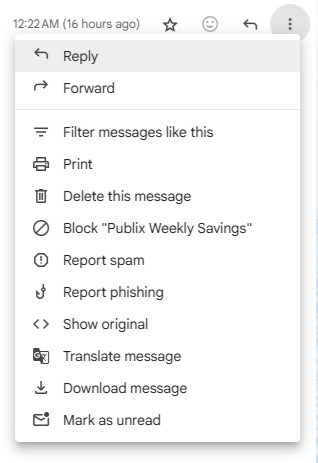
This will tell Google to search your inbox for all messages that were sent by this sender. From this screen, you should do one of three things:
- Delete the emails
- Label and archive the emails
- Create a filter that will label the emails that you have and automatically label the emails that come in from this sender going forward.
Chances are pretty good that you’ll want to create a filter here.
Select “Create Filter”. You will be given the following options:
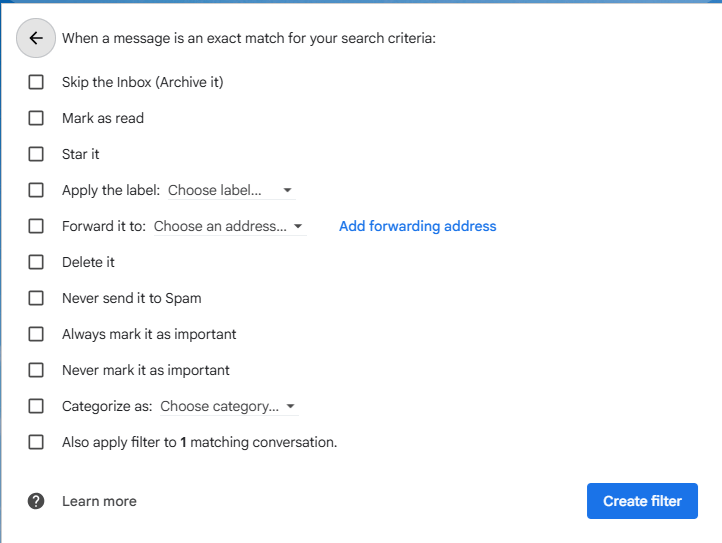
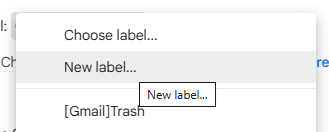
For now, we’re going to focus on setting up a label for this sender. Check the box next to “Apply the label:”. If you don’t have any labels set up before now, then click on the triangle next to “Choose label…” and select “New label…” from the menu that comes up:
You will then get this box:
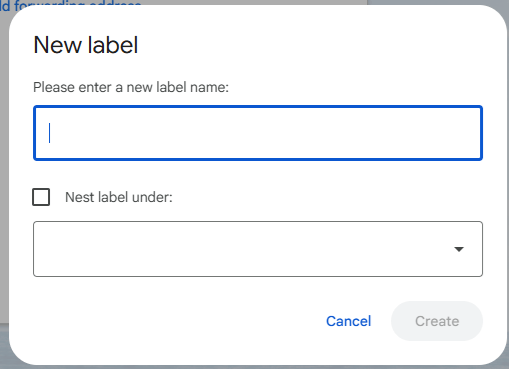
Give your label a name. As you go through this process you might want to use a label as a sort of ‘subfolder’ underneath a broader label category. If you want to do that, check on the box next to “Nest label under:” and select the label of your broader category.
Click on “Create” to create your label.
This will bring you back to the screen with your filtering options. Add any additional rules that you want to apply to this filter and click on “Create Filter”. NOTE: If you want the filter to automatically label anything that currently fits this label, then check the box for “Also apply filter to __ matching conversations” before you click on “Create Filter”.
You’ll then want to archive all of these emails (if you haven’t used the filter to do so already). Click on the checkbox above your list of emails, which will allow you to check all of the emails in your list:
The box with the down arrow just to the right of that checkbox is the “archive” button. You should see it — which will allow you to archive all selected emails with a single click. If you do not see it, however, then the archive option will probably show up in the menu that you will see when you select the three dots at the end of that menu bar:
And that’s basically it. Repeat the following steps until all of your emails are labeled and archived:
- Select a set of emails
- Label them OR Create a filter
- Archive or delete them as you see fit.
Is this going to take a while? Probably, especially if you haven’t set up a digital filing system like this before. But — especially if you take the time to set up filters — you won’t have to spend nearly this much time slogging through your archive of emails going forward.
In Outlook (or other email systems)
The overall process of how you deal with emails in Outlook or other email platforms isn’t that different from the way you need to think about handling emails in Gmail. The biggest differences are that you have folders instead of labels (as described above) and filters (in Outlook, at least) are called Rules.
- Select an email in your inbox.
- Create a folder to put the emails in. This folder can be a subfolder of your inbox or archive (wherever you prefer).
- Search for the sender of that email (if you’d like to try to file your emails in bulk).
- Select your email(s) and move them into your new folder.
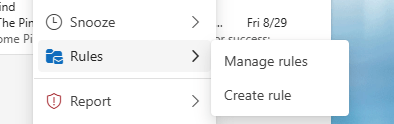
Rules
Creating rules in Outlook is very similar to the process of creating filters in Gmail as described above. The main thing you need to know is that the rule creation dialog can be found by right-clicking on any email:
Digital decluttering can be a monumental process. It doesn’t seem that way because your laptop never changes; it looks the same whether you have zero emails in your inbox or ten thousand. However, properly slogging through those emails is a satisfying process that can free up hours in your life — when you do it properly.
I hope this post has demystified the process for you. I’m not going to say that it’s easy because it isn’t. But it is worth it.
If you have any questions, I’m here to help. Leave your questions in the comments and I’ll do my best to answer them.

Leave a comment